Home lab switch replacement
A few years back, I purged nearly all of my computer components that were kicking around the house, thus essentially abandoning my home lab. I had learned what I needed to with it, and had enough equipment at work to get done what I needed, so off it went. Old PCs, switches, cables, parts, etc. were all sold off, and it felt good to finally declutter. Fast forward a few years and I find myself with a different job, tackling different problems, new technology is out and the need to invest in a home lab has become important again. When I was looking at routers/switches, mikrotik came up and looked like a good option – pretty feature full and open source. I bought a couple of these, and later found out the LACP implementation had some limitations. This didn’t matter much until recently when I’ve began using 30+ VMs on a hypervisor. After some light research, and a helpful /r/homelab community, I decided on a Dell PowerConnect 6224 from ebay.
The Dell’s are pretty feature-full as well, and their OS has been modeled after Cisco’s. I’ve done work with Cisco gear in the past, so that was a good fit for me and a chance to get my hands dirty in networking again. I found a good deal from Geekfurb and spent this weekend setting it up.
When I first turned it on, it was quite a bit louder than expected. Certainly too loud to sit in the same room with. I got a few replacement fans, which managed to reduce the noise considerably from about 40 dBA, to about 18 dBA. Luckily I did some googling before replacing the fans as I ran into a known issue with the fan wiring. Dell has a different wire sequence in their fans, so you’ll want to watch this youtube video when replacing them. Because my fans are 4.53 CFM and the OEM ones were 7.5 CFM, I’ve got a red fan status light on my switch. I think the lower RPM is throwing it off. All my fans work, and the switch powers on and passes diagnostics just fine. Here’s a before and after sound comparison for the replacement:
Before:
After:
Much better. Even with three fans at 18 dBA each, it’s much quieter than before, and is easy to be in the same room as. As for connections, this switch has the old DB9 serial port on it, instead of the RJ45 management port. For clarity sake, there’s a couple ways network switches can be connected to. The older variety of gear will use the DB9 male serial port, which you’ll need a null modem cable and likely a DB9 to USB converter cable to use with a modern laptop. The newer variety of gear will have the RJ45 management port on the switch, which you’ll need a DB9 to RJ45 cross-over cable, and also DB9 to USB converter. Unless you’re using an old enough PC/laptop that has a serial port. Here’s what they look like:

 {.alignnone}
And the rear of the switch:

You can use any terminal emulator software to connect to the switch. Putty is a popular option that’s easy to use, there’s a package available for linux. In my case, the serial tty I’m using comes up as `/dev/ttyUSB0`. After I connect through that to the switch, I reset it to factory settings from the boot menu, and went to work. The main configuration I’m after is setting up link aggregation groups, and configuring the switch ports:
$ show running-config

# switchport configuration
!
interface ethernet 1/g7
channel-group 1 mode auto
description 'LACP for hypervisor 1'
exit
!
interface ethernet 1/g8
channel-group 1 mode auto
description 'LACP for hypervisor 1'
exit
!

# port-channel configuration
interface port-channel 1
description 'LACP group hypervisor 1'
exit

$ show interfaces status

Port   Type                            Duplex  Speed    Neg  Link  Flow Control
                                                             State Status
-----  ------------------------------  ------  -------  ---- ----- ------------
1/g7   Gigabit - Level                 Full    1000     Auto Up     Active
1/g8   Gigabit - Level                 Full    1000     Auto Up     Active

...

Ch   Type                            Link
                                     State
---  ------------------------------  -----
ch1  Link Aggregate                  Up
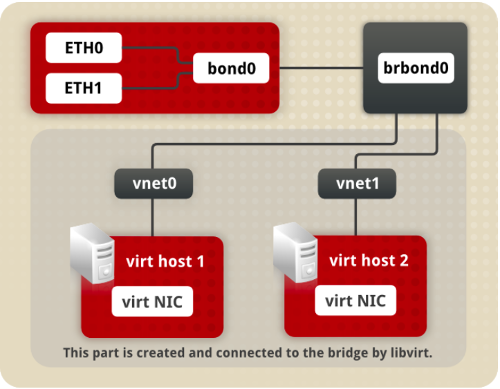
With that work done, on each hypervisor I’ve created a linux bond with the two NICs, then a linux bridge on top of that for attaching virtual networks. The detailed steps are here, but this is what it looks like:
All finished! Testing with iperf shows I’m getting close to line speed on the interfaces (~940 Mbit on 1 Gigabit NICs), so the setup is correct. To really test the aggregate bandwidth I’ll have to simulate multiple simultaneous connections. I’ll leave that for another day. Perhaps let this sit for a while and attach some switch statistics to back up the bandwidth numbers. All in all, for less than $150 I’ve finally got all my lab systems setup with LACP.